Saturday 5 December 2015

December Blog Hop:

"Christmas Gifts"


Welcome to another blog hop! A "Blog Hop" is a circular link between a group of bloggers (in this case my fellow CTMH consultant team members).  No matter where you start, you can view all our blogs in this blog hop.  If you have come from Julie's blog then you are on the right track.

This month we are showing you some ideas to use as Christmas Gifts.  The photo below shows the Christmas decorations I have made and will add to the presents I will give to my daughters teachers and other friends and family.  It adds a nice personal touch, and is something they can keep and bring out each year with their other Christmas decorations.


It might look difficult but it is really very easy.

Firstly cut a strip of patterned paper 12" long x 1" wide.
Using the Score board, score every quarter inch.
Next, concertina fold the strip all the way to the end.
Using liquid glass, stick the two ends together to form a circle.
Push the circle down flat.Put liquid glass in and around the center hole and adhere to a round circle of cardstock on the under side of the decoration (see below).
The size of my circle is 1 and a 1/2 inches and is cut from Cranberry cardstock.
The circle on the front is 1 and a 1/4 inches and I used the Red Glitter Paper to add some sparkle.  Adhere the circle with more liquid glass and hold the front and back circles for a minute to make sure they have bonded enough to sit aside.

The beautiful top on this decoration is our Base & Bling jewellery.  I have used the Gold circle pendant in the decoration above, but have also used the Silver circle pendant on others.   The Christmas designs in the middle are from the Base & Bling Jolly Holiday Style Sheet.  I finished it off with the Circle Glass Cover.

Rather than reinvent the wheel, I will redirect you to a CTMH youtube video which explains how to put together the Base and Bling pendant.

You will need to adhere the Base & Bling using more liquid glass.  Other bonding adhesives are not strong enough to adhere to the glitter paper.  This needs 10-15 minutes to properly adhere.

To finish off, use some Thick Twine (I used Fern, Poppy and Glacier) to be able to hang the decoration.

I think these decorations are beautiful and were very quick and easy to make.  I made them with customers at our recent Christmas workshop and they loved them.

Thanks again for visiting my blog.  If you want to view more of the Close To My Heart products, just go to my website www.wendywatson.ctmh.com.au

Now, for more great Christmas gift ideas, 'hop' over to Cindy's Blog to see what she has created this month.

Happy crafting!
Wendy


Tuesday 1 December 2015

December Stamp of the Month:

"Candlelight Garden"


The Stamp of the Month for December is the beautiful "Candlelight Garden".


I really enjoyed using this stamp to make some cards.  These are my two favourites and my inspiration for them came from cards made by Denise Tarlinton and Wendy Coffman.


I stamped the jar and flowers on the right hand side of the front of the card, then fussy cut around the stamping to reveal about an inch of the inside of the card.  On the right hand side edge of the inside of the card I had adhered a strip of B&T paper from the La Vie En Rose paper pack.  

Using freehand, I drew a line around the front of the card using the Journaling Pen.  To colour the flowers and water in the jar, I used the watercolour paints that I featured in my last blog.    They are so easy and fun to use.  The three purple hearts under the "Thank You" sentiment, are from the Purple Hearts Enamel & Glitter Duos.


It is such a pretty stamp set and can be yours for only $5 with any order $75 or more, but only during the month of December 2015.

If you want to view more of the Close To My Heart products, just go to my website www.wendywatson.ctmh.com.au.

Happy crafting!
Wendy


Thursday 5 November 2015

November Blog Hop:

"Watercolours"

Welcome to another blog hop! A "Blog Hop" is a circular link between a group of bloggers (in this case my fellow CTMH consultant team members).  No matter where you start, you can view all our blogs in this blog hop.  If you have come from Michelle's Blog Michelle K Scraps then you are on the right track.

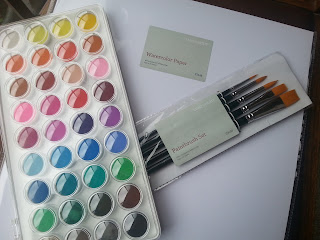
CTMH watercolour inks


This month is all about using Watercolours.  The photo above shows the new CTMH Watercolour Paints, Watercolour Paper and the Paintbrush set.

My favourite use of the watercolours is to paint a background.  The tree on the below card is from the stamp set called "Always Grateful".  The sentiment is from "Sincere Expressions".  I let the watercolours dry before stamping the tree with Black Archival Ink.

CTMH watercolour background

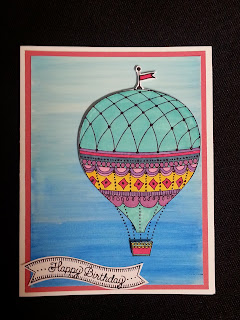
On the following card, I used the same technique, only using different shades of blue for the sky.


CTMH watercolour background balloon

I separately stamped the balloon (from the "Balloon Wishes" stamp set) and coloured it in using the ShinHan Markers.  After fussy cutting around it, I adhered it to the card using 3D foam tape.  This gives the card a bit of dimension and it look like the balloon is floating across the sky.

Here are two of my other cards.

CTMH watercolour background KangarooCTMH watercolour background


Although using these products was a bit daunting at first, I can honestly say it was lots of fun experimenting with them.  My biggest tip - just have a go and see what results.

Thanks so much for taking the time to visit my blog.  If you want to view more of the Close To My Heart products, just go to my website www.wendywatson.ctmh.com.au

Now, for more great ideas using the CTMH Watercolours, 'hop' over to Cindy's Blog to see what she has created this month.

Happy crafting!
Wendy


Tuesday 6 October 2015

October Blog Hop:

"Enchantment"

The "Enchantment" range of colours has seven new shades.
So we decided to showcase this colour range in our October Blog Hop.

Hello and welcome to another Blog Hop.  If you have come from Julie's Blog Julie's papercraft then you are on the right track.

Below is the simple one page layout that I put together for this blog.
It is based on the layout on page 70 of the Annual Inspirations and uses the new Urban paper pack and new Fundamentals - Enchantment pack.

The photos below show the opposite sides of the Fundamentals- Enchantment papers.  One side has a subtle glossy resist pattern and the other side has the same pattern but in a bold white print.  My layout uses the bold print of the pomegranate shade (as the mat for my photo) and the glossy side of the fern and saffron shades (the 12" strips).  The gloss was hard to show in a photo but does look gorgeous when the light reflects off it.


My daughter has just returned from an exchange to America, so this photo (taken with her brother at the Melbourne airport before she left), also gave me the perfect opportunity to use some of the new travel stamps.  These included Here We Go (D1600), American Celebration (D1458) and Colorado (M1066).
 The Exclusive Inks used to stamp these were Fern, Pomegranate, Saffron and Sapphire.  These are four of the seven new colour shades and match the papers from the Fundamentals - Enchantment pack that I have used.

Thanks for visiting my blog.  If you want to view more of the Close To My Heart products, just go to my website www.wendywatson.ctmh.com.au

Now 'hop' over to Alison's Blog "Scissors Paper Heart" to see what she has created using the Enchantment colours.

Happy crafting!
Wendy 


Thursday 24 September 2015

"La Vie En Rose"

Workshop on the Go

Last weekend I enjoyed some more scrapbooking using the new products in the Annual Inspirations, released this month.  

My favourite double page layout was this one, using the La Vie En Rose Workshop on the Go.  Such gorgeous papers in this pack, and the stamp set is great for family photos such as I was using.

Wendy Watson www.wendywatson.ctmh.com.au

My layout is based on the additional layout in the La Vie En Rose Workshop on the Go, however I used the Silver Foil tape instead of the Gold Foil tape and I added the Poppy Thick Twine across the top for a bit of extra colour.  I stuck the twine on using Liquid glass.  I only had to hold the twine down for a few seconds and the liquid glass held it.  Very easy.
Wendy Watson www.wendywatson.ctmh.com.au

Wendy Watson www.wendywatson.ctmh.com.au
If you want to view more of the Close To My Heart products, just go to my website www.wendywatson.ctmh.com.au.

Happy crafting!
Wendy

Thursday 3 September 2015

September Blog Hop:

 Our Favourite New Product!


Spring is here and so is our new CTMH "Annual Inspirations"!


Hello and welcome to another Blog Hop.  If you have come from Michelle's Blog Michelle K Scraps then you are on the right track. 

From 1 September 2015, we have a brand new "Annual Inspirations".  How exciting!  So many new products - new papers, new colours, new organisation products, new stamps, the list goes on.

So when I needed to decided what my "favourite product" from the new Inspirations book was, it was really hard to choose!

In the end, I cheated a little and chose the Sangria Paper Pack / Workshop on the Go. This is not only my favourite paper pack, but it also incorporates my favourite new colours - Eggplant, Pomegranate and Poppy!  These are just three of the seven beautiful new colours introduced in this "Annual Inspirations".


Here is the page I created (based on a previous CTMH layout) using the Sangria paper, Pomegranate cardstock, Eggplant cardstock, Eggplant exclusive ink and Sangria assortment pack.  (Note that the Sangria Workshop on the Go includes all these products (excluding the ink pad) as well as an exclusive stamp set.)

Also available from now are products in the new "Holiday Expressions".  These products include Christmas and Halloween themed papers, stamps and ideas and are available until 31 December 2015.


Thanks again for visiting my blog.  If you want to view more of the Close To My Heart products, just go to my website www.wendywatson.ctmh.com.au

Now, for more exciting new products, 'hop' over to Cindy's Blog to see what her favourite new product is.

Happy crafting!
Wendy

Saturday 1 August 2015

August Blog Hop - Mini Albums

Hello again and welcome to another Blog Hop.  If you have come from Michelle's Blog Michelle K Scraps then you are on the right track.  For a complete list of the blog participants, click here.

This month our blog hop is showcasing "Mini Albums".  

There are several types of "mini" albums including  My Creations™ Mini Mix AlbumMy Creations™ Mini FolioMy Creations™ Hip Pics AlbumMy Creations™ Black Mini Book.

There are many uses for these books.  For example a selection of photos from a trip that you went on. Instead of showing family & friends the 100's of photos taken, you can show them a few of your favourites! They are a great gift for tweens or teenagers to use as journals and to put photos of friends in.  I have sold quite a few to customers specifically for this purpose.

When you add a few photos I think these books make the most wonderful, personal gifts you could ever give.  This is what my blog is all about today.

Back in April/May, we hosted Haley from Colorado, America. At the end of the three weeks, I had so many photos for her to take home on a USB stick, however, I wanted her to be able to have a little book to show her family and friends as soon as she arrived home. 

So on the day before she left, I made this "mini album" and gave it to her at the airport.

The album I used was the Designer Creations Short Stack Album.  This has ten wire-bound kraft pages measuring  5" × 7"; with a kraft printed hardcover.

After printing a small selection of photos, and adding a few embellishments, washi tape and stamped headings, the album was almost complete.  The final personal touch was to adhere a 3" X 3" White Daisy Envelope to the inside of the back cover.  My daughter, Laura, wrote a personal note to her American 'sister' and this is where we put the letter.  

For a look at a few sample pages from Haley's album, keep scrolling down.

Thanks so much for taking the time to visit my blog.  If you want to view more of the Close To My Heart products, just go to my website www.wendywatson.ctmh.com.auPlease note that the My Crush™ Books are on the while stocks last list, several of the themes are already sold out.  So if you are wanting one of these mini albums, you should act fast.

Now, for more great ideas using mini albums, 'hop' over to Alison's Scissors Paper Heart Blog to see what she has created this month.

Happy crafting!
Wendy


Here are a sample of a few of the pages from the mini album:

Wednesday 1 July 2015


July Blog Hop - "Operation Smile"


Welcome to another blog hop!  If you have arrived from Helen's Blog (Helen's Heart 'n' Craft) then you are on the right path.

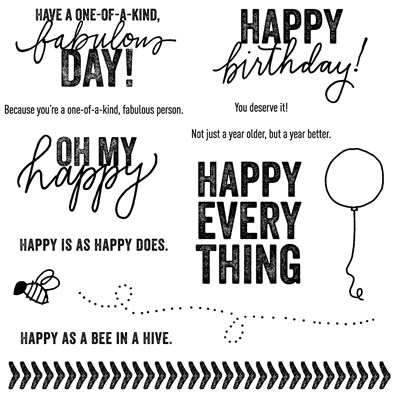
In this months Blog Hop we are promoting the stamp set Happy Everything, sales from which go towards raising money for a very special cause, "Operation Smile"
"Since its founding in 1982, Operation Smile has performed over 220,000 surgical procedures to correct facial deformities in children.  It only takes an hour for volunteer medical teams to perform these life-altering surgeries that will give children confidence for a lifetime"  CTMH Seasonal Expressions 2 Idea Book.
If you would like more information and to read some truly inspirational stories about 'Operation Smile', see their website.

For every Happy Everything stamp set (see below) sold, CTMH will donate US$3 to Operation Smile.


This is the card I created using this stamp set: 


The card uses the "masking technique" and is based on a similar card made by Lauren Moore.
I have been wanting to try this technique for a long time now.  It is such an effective and simple way to add colour - and is very easy.

The technique uses masking tape, washi tape or any tape that can be removed without leaving behind any residue or damaging the surface of the paper.  Take a piece of tape and press it against a stamp pad.  Lift it off, and then stick it to your paper.  When the tape is lifted off the paper, the ink will remain on the paper. 


This was done three times for the three colours on my card: Canary, Crystal Blue and Smoothie.  The balloon was then stamped over the three colours using Outdoor Denim ink.  The Happy Birthday sentiment was also stamping using Outdoor demin.


This design was then mounted on Crystal Blue Cardstock and three Aqua Dots added to the top right hand corner to add some 3D dimension to the card.


I hope you will support this very worthwhile cause, by purchasing this versatile stamp set.

Thanks for stopping by.  If you want to view more of the Close To My Heart products, just go to my website www.wendywatson.ctmh.com.au

Now, for more great ideas using this stamp set, jump over to Alison's Scissors Paper Heart Blog to see what she has created this month.

Happy crafting!
Wendy

Monday 15 June 2015

June 2015 Stamp of the Month

June Stamp of the Month - Ice Cream Dream


What a fun stamp set CTMH are offering for their June Stamp of the Month - "Ice Cream Dream".


Here is my scrapbook page using this stamp set.  It is based on Pattern 13 out of the CTMH book of inspirational layouts  "Make it from your Heart. Volume 1".


The paper pack I have used is Hopscotch (no longer available).  Cardstock is Gracier, Holyhock, and Colonial White.  The stamping is done using Indian Corn Blue Stamp Pad, the ice-creams and cute dog were then fussy cut using the Non-stick Micro tip scissors, and coloured in with the fabulous Shinhan Markers (Carmine, Tender Pink, Barely Beige, Mahogany and Peony Purple).  The 3D foam tape was used to give them a 3D look on the page.


This is a really cute stamp set to use with your scrapbooking pages or to use on cards, see my examples below.


Remember that the "Ice Cream Dream" stamp set is only available for the month of June and is only $5 with any qualifying order of $75 or more.  If you want to view more of the Close To My Heart products, just go to my website www.wendywatson.ctmh.com.au.

Happy crafting!
Wendy